

My family is getting ready for a big wedding, and I’ve been working on some simple DIY wedding projects for the occasion. In this step-by-step tutorial, I’ll show you how to use your Cricut to create a custom make-up case. You’ll also learn how to apply HTV to nylon and faux leather, and how to use the Guide feature in Cricut Design Space to simplify your DIY projects.

For years, I’ve relied on the Templates tool in Cricut Design Space to help me visualize my project. You can access this tool in the Design Panel located on the left-hand side of the Canvas. However, the Templates tool has its limitations – for instance, you can’t use more than one template per project, the template doesn’t save with your project, and the selection of designs is somewhat limited.

Let’s Take a Look at Design Space Guides
The Guide feature is available in the Desktop, Android, and iOS app. This tool allows you to transform any image, text, or shape into a guide, making project layout simple.
Previously, designers would use Templates or place a shape on the Canvas to visualize their work, which would need to be hidden or deleted before cutting out the design. With the Guide feature, you can easily plan your project by simply changing the line type.

How to Add a Design Space Guide to a Project
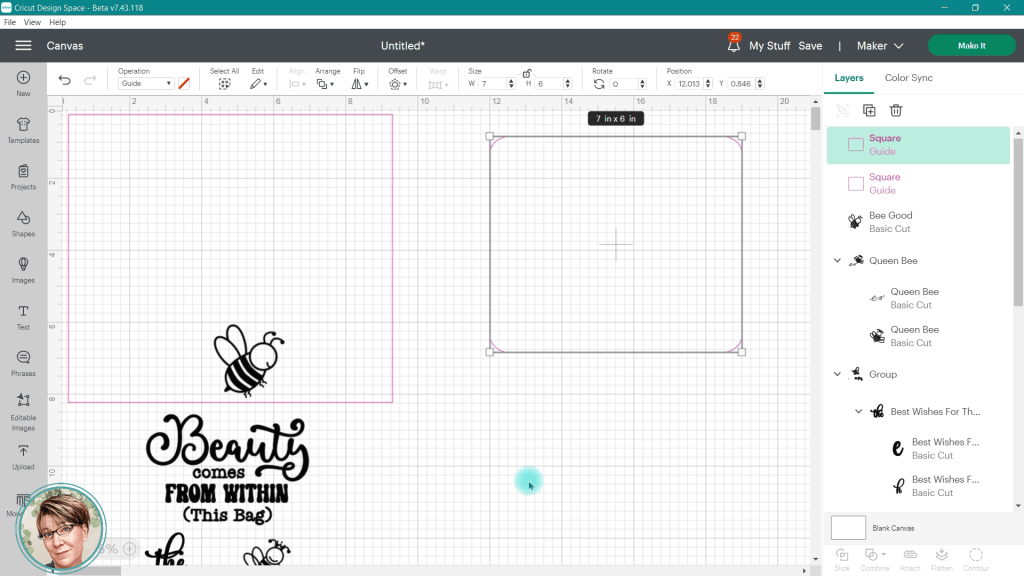
To create a Guide, insert a shape, image, or text onto the Canvas. Resize to the measurement of your project, then use the Operation drop down menu to change the item to a Guide.
The basic cut image, will become an outline that can be used to visualize your project. This Guide will not cut or do any other function when you cut out your project.
The Advantages of Using Design Space Guides
Guides can be just as useful as templates when it comes to visualizing a project. Unlike templates, however, guides can be created in any shape or size, and you can add more than one guide to a single project.
For this custom make-up case project, I used the Guides to size the designs for my project. They created a mock-up of the top of the case and the inside panel where I wanted to place my iron-on vinyl.

Additional Uses for Design Space Guides
I often use a Guide to design a scrapbook page or card. After adding the card base or page shape to my Canvas, I use the Operation menu to turn the shape into a guide. If needed, I can add a score line or border elements and change them into guides, also.
Once I have a guide, I add images, phrases, a title and photos to help me visualize the project.

Guides can also be used to add notes on the Canvas that won’t be visible when you finalize your project. It’s a handy feature to keep in mind, especially when working with templates.
For instance, if you’re creating a clothing item from a Template, the template you selected will not save with the project. Notes can be created with text to remind yourself of the style and size, which you can then convert into a guide.

Design Space’s Guides feature has been a game-changer for me when it comes to crafting. Not only can I visualize a mock-up of my design, but I can also use multiple templates on a project and add notes for myself or others I share the project with.
Check out the video below to see how I utilized Guides to create a Personalized Wedding Craft and pick up some helpful tips for adding iron-on vinyl to the materials on this makeup case.
This customized make-up case is a great gift for a new bride, college student, or young teen. With various images available on the Creative Fabrica website, you can make this gift truly unique. Be sure to check back in the upcoming weeks for more DIY wedding project ideas that you simply can’t miss.
I’m so excited to see the projects that you create. Don’t forget to share your finished creations with me. You can leave me a comment below with a direct link or tag @misscarriescreations on your favorite social media site.

Hey friends! I wanted to let you in on the products I use in my videos. Just so you know, I’m not getting paid to promote any of them, but I do have some affiliate links available if you want to check them out. If you end up buying something through those links, it would mean a lot to me and my business. And don’t worry, you won’t be charged any extra. Thanks for your support! Learn more